October is here, and what better way to celebrate the spooky season than with a delightfully eerie treat? Forget carving pumpkins (just for a moment!), because today we’re diving headfirst into the world of Spooky Red Velvet Cake Pops! These aren’t your average cake pops; we’re talking vibrant red velvet, dipped in decadent chocolate, and decorated to resemble everything from mischievous monsters to ghostly eyeballs. They’re the perfect party snack, a fun activity to do with kids, or simply a sweet indulgence for yourself. Get ready to unleash your inner baker and create a batch of these hauntingly delicious bites!
Why You’ll Love This
- Fun & Festive: These cake pops are *made* for Halloween! The red velvet color and spooky decorations instantly add a playful touch to any gathering.
- Surprisingly Easy: While they look impressive, cake pops are surprisingly straightforward to make. We’ll break down each step to ensure success.
- Perfectly Portable: They’re individually portioned and easy to transport, making them ideal for parties, potlucks, or trick-or-treating alternatives.
- Red Velvet Delight: Who can resist the classic, slightly tangy flavor of red velvet cake?
- Customizable: Get creative with your decorations! Use different colored chocolate, sprinkles, edible markers, and more to create unique spooky designs.
Ingredients & Equipment
Ingredients:
- Red Velvet Cake: 1 box (15.25 oz) red velvet cake mix, baked according to package directions and cooled completely. (Or use leftover red velvet cake!)
- Cream Cheese Frosting: 8 oz cream cheese frosting (store-bought or homemade)
- Candy Melts: 12 oz dark chocolate candy melts (or your preferred color for a spooky effect – orange, purple, or even white!)
- Vegetable Shortening: 1 tablespoon (for thinning the candy melts, optional)
- Lollipop Sticks: 30-40 lollipop sticks
- Decorations: Sprinkles, edible eyes, edible markers, colored sugar, etc. – let your imagination run wild!
Equipment:
- Baking Pan (for cake if not using leftover)
- Mixing Bowls
- Electric Mixer (handheld or stand mixer)
- Cookie Scoop or Spoon
- Baking Sheet lined with parchment paper
- Double Boiler or Microwave-Safe Bowl
- Styrofoam Block (for holding cake pops while drying)
Step-by-Step Instructions
- Crumble the Cake: Once the red velvet cake is completely cooled, crumble it into a large mixing bowl. Ensure there are no large chunks.
- Mix with Frosting: Add the cream cheese frosting to the crumbled cake. Mix well with an electric mixer until a dough-like consistency is achieved. You want it to be firm enough to roll, but not too dry.
- Roll into Balls: Using a cookie scoop or spoon, roll the mixture into 1-inch balls. Place the balls onto a parchment-lined baking sheet.
- Chill the Balls: Place the baking sheet in the freezer for at least 30 minutes. This helps the cake pops firm up and prevents them from falling off the sticks.
- Melt the Candy Melts: Melt the candy melts in a double boiler or in the microwave in 30-second intervals, stirring in between, until smooth. If the candy melts are too thick, add 1 tablespoon of vegetable shortening and stir until combined.
- Dip the Sticks: Dip the tip of each lollipop stick into the melted candy melts and insert it about halfway into a chilled cake pop ball. This helps the stick adhere to the cake pop.
- Dip the Cake Pops: Dip each cake pop into the melted candy melts, swirling to coat completely. Gently tap off any excess chocolate.
- Decorate: Immediately add sprinkles, edible eyes, or other decorations while the chocolate is still wet.
- Dry & Set: Insert the decorated cake pops into a styrofoam block to dry and set completely.
Pro Tips
- Cake Consistency is Key: If your cake mixture is too dry, add a tiny bit more frosting. If it’s too wet, add a little more crumbled cake.
- Chill, Chill, Chill: Don’t skip the chilling steps! This is crucial for preventing the cake pops from falling apart.
- Thinning the Candy Melts: Vegetable shortening is your friend! It helps create a smoother, more dippable consistency.
- Preventing Cracks: Dip the cake pops quickly and avoid over-swirling. A smooth, even coat is best.
- Edible Markers for Details: Use edible markers to draw spooky faces or add intricate details to your cake pops.
Storing Leftovers
Leftover cake pops can be stored in an airtight container at room temperature for up to 3 days. For longer storage, you can refrigerate them for up to a week, but the chocolate may become slightly dull. You can also freeze them for up to 2 months. Wrap each cake pop individually in plastic wrap before placing them in a freezer-safe container. Let them thaw at room temperature before enjoying.
Print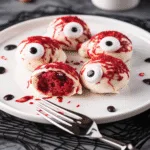
Spooky Red Velvet Cake Pops Recipe
- Total Time: 1 hour
- Yield: 48 cake balls 1x
- Diet: Vegetarian
Description
How fun are these Spooky Eyeball Red Velvet Cake Balls for Halloween? Great for dessert, bake sales, and class parties!
Ingredients
1 box Red Velvet Cake mix, with ingredients to bake 13×9 cake (16.5 oz)
1 cup canned cream cheese frosting
2 (10 oz) packages Ghirardelli white chocolate melting wafers
2 tubes sparkly red gel
48 blood shot candy eyes
Instructions
1. Prepare cake according to package directions for a 13×9 baking dish. Allow to cool slightly.
2. Dump cake into a bowl, and crumble with your hands. Mix in the 1 cup of canned frosting.
3. Line a baking sheet with parchment paper. Using a 1 Tbsp cookie scoop, form about 48 cake balls.
4. Freeze cake balls for one hour (or more).
5. When ready to dip, melt white chocolate according to package directions. Using a toothpick, press into cake ball and dunk in white chocolate. Tap on side of bowl to remove excess. Slide off of toothpick (using a second toothpick) and drop onto parchment paper. Repeat for remaining cake balls.
6. Drizzle red gel on top of cake ball and press candy eyeball on top.
7. Store in an airtight container in the refrigerator until ready to eat, up to 3 days for best flavor.
Notes
Keep these in a container in the fridge. They taste best if eaten within 3 days.
You can use white chocolate chips instead of melting chocolate, but the cake balls will not be as smooth or even. Melting wafers taste great and set up soft enough to bite into.
- Prep Time: 1 hour
- Category: Candy
- Method: No-Bake
- Cuisine: American
Nutrition
- Serving Size: 1 cake ball
- Calories: 308
- Sugar: 42g
- Sodium: 115mg
- Fat: 6g
- Saturated Fat: 3g
- Unsaturated Fat: 2g
- Carbohydrates: 63g
- Fiber: 1g
- Protein: 1g
- Cholesterol: 2mg