Halloween is just around the corner, and what better way to spook and delight your guests than with these incredibly impressive (yet surprisingly easy!) Halloween Spiderweb Brownies? Forget store-bought treats – these decadent, fudgy brownies, adorned with a stunning white chocolate spiderweb, are guaranteed to be the centerpiece of your spooky spread. They’re perfect for parties, trick-or-treaters, or just a fun baking project with the kids. Don’t be intimidated by the web design; it’s simpler than it looks, and the wow factor is HUGE. Get ready to become the Halloween baking hero!
Why You’ll Love This
- Easy to Make: Despite their show-stopping appearance, these brownies are surprisingly straightforward to make.
- Fudgy & Delicious: We’re starting with a fantastic brownie base – rich, fudgy, and intensely chocolatey.
- Visually Stunning: The white chocolate spiderweb is a guaranteed conversation starter and adds a touch of spooky elegance.
- Fun for All Ages: Kids will love helping with the web design (with a little supervision, of course!).
- Perfect for Halloween: These brownies are the ultimate Halloween treat!
Ingredients & Equipment
Ingredients:
- For the Brownies:
- 1 cup (2 sticks) unsalted butter, melted
- 2 cups granulated sugar
- 4 large eggs
- 1 teaspoon vanilla extract
- ¾ cup unsweetened cocoa powder
- 1 cup all-purpose flour
- ¼ teaspoon salt
- ½ cup chocolate chips (optional, for extra chocolatey goodness!)
- For the Spiderweb:
- 8 ounces white chocolate, chopped
- Black gel food coloring (very important – gel, not liquid!)
Equipment:
- 9×13 inch baking pan
- Parchment paper
- Mixing bowls
- Electric mixer (handheld or stand mixer)
- Toothpick or skewer
- Microwave-safe bowl (for melting white chocolate)
Step-by-Step Instructions
- Prepare the Brownies: Preheat oven to 350°F (175°C). Line a 9×13 inch baking pan with parchment paper, leaving an overhang on the sides for easy removal.
- Make the Brownie Batter: In a large bowl, combine melted butter and sugar. Beat with an electric mixer until well combined.
- Add Eggs & Vanilla: Beat in eggs one at a time, then stir in vanilla extract.
- Combine Dry Ingredients: In a separate bowl, whisk together cocoa powder, flour, and salt.
- Combine Wet & Dry: Gradually add the dry ingredients to the wet ingredients, mixing until just combined. Do not overmix. Stir in chocolate chips, if using.
- Bake the Brownies: Pour batter into the prepared pan and spread evenly. Bake for 20-25 minutes, or until a toothpick inserted into the center comes out with slightly moist crumbs.
- Cool Completely: Let the brownies cool completely in the pan before frosting. This is crucial for a clean spiderweb design!
- Melt the White Chocolate: Place chopped white chocolate in a microwave-safe bowl. Microwave in 30-second intervals, stirring after each interval, until completely melted and smooth.
- Color the White Chocolate: Add a *very* small amount of black gel food coloring to the melted white chocolate. Stir well. Add more coloring, a tiny drop at a time, until you achieve a light grey color. (Too much coloring can seize the chocolate!)
- Create the Spiderweb: Pour the grey white chocolate over the cooled brownies and spread evenly.
- Draw the Web: Immediately, using a toothpick or skewer, start at the center of the brownies and drag lines outwards towards the edges. Repeat this process, rotating the pan as you go, to create a spiderweb effect.
- Let Set: Allow the white chocolate to set completely before cutting and serving.
Pro Tips
- Don’t Overbake: Overbaked brownies will be dry and crumbly. Aim for slightly moist crumbs when testing with a toothpick.
- Use Gel Food Coloring: Liquid food coloring will thin out the white chocolate and make it difficult to create a defined web. Gel food coloring is essential.
- Work Quickly with the White Chocolate: The white chocolate will start to set as it cools, so you need to work quickly when creating the spiderweb design.
- Chill for Easier Cutting: If the brownies are very soft, chill them in the refrigerator for 30 minutes before cutting for cleaner slices.
- Add a Spider! For an extra spooky touch, place a plastic spider on top of the web before the chocolate sets.
Storing Leftovers
Store leftover Halloween Spiderweb Brownies in an airtight container at room temperature for up to 3 days. For longer storage, you can refrigerate them for up to a week. However, the white chocolate may become slightly softer when refrigerated. You can also freeze the brownies (without the spider, if you used one!) for up to 2 months. Wrap them tightly in plastic wrap and then in aluminum foil before freezing.
Print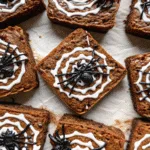
Impress With Halloween Spiderweb Brownies
- Total Time: 45 minutes
- Yield: 16 brownies 1x
- Diet: Vegetarian
Description
Fudgy, festive Halloween brownies loaded with chocolate and topped with spooky candies for the perfect October treat.
Ingredients
1/2 cup unsalted butter, melted
1 cup granulated sugar
2 large eggs
1 tsp vanilla extract
1/3 cup unsweetened cocoa powder
1/2 cup all-purpose flour
1/4 tsp salt
1/4 tsp baking powder
1/2 cup semi-sweet chocolate chips
1/4 cup Halloween-colored sprinkles
1/2 cup Halloween candy (candy eyes, M&Ms, candy corn)
Instructions
1. Preheat oven to 350°F (175°C) and line an 8×8-inch baking pan with parchment paper.
2. In a medium bowl, mix melted butter and sugar until well combined.
3. Add eggs and vanilla extract, beating until smooth and glossy.
4. Stir in cocoa powder, flour, salt, and baking powder until just combined.
5. Fold in chocolate chips and spread batter evenly into the prepared pan.
6. Sprinkle Halloween-colored sprinkles and candies evenly on top.
7. Bake for 25–30 minutes, or until a toothpick inserted in the center comes out with moist crumbs.
8. Allow to cool completely before cutting into squares and serving.
Notes
For a gooier texture, bake for 25 minutes; for firmer brownies, go closer to 30.
Customize with your favorite Halloween treats like mini peanut butter cups or crushed cookies.
Store leftovers in an airtight container at room temperature for up to 3 days.
- Prep Time: 15 minutes
- Cook Time: 30 minutes
- Category: Dessert
- Method: Baking
- Cuisine: American
Nutrition
- Serving Size: 1 brownie
- Calories: 180
- Sugar: 17g
- Sodium: 80mg
- Fat: 9g
- Saturated Fat: 5g
- Unsaturated Fat: 3g
- Trans Fat: 0g
- Carbohydrates: 24g
- Fiber: 1g
- Protein: 2g
- Cholesterol: 35mg