October is here, and what better way to celebrate the spooky season than with a batch of enchanting Witch Hat Brownies? These aren’t your average brownies; we’re taking classic fudgy goodness and transforming it into adorable, edible witch hats! Perfect for Halloween parties, classroom treats, or just a fun baking project with the kids, these brownies are guaranteed to cast a spell on everyone who tries them. They’re surprisingly easy to make, and the visual impact is *huge*. Get ready to impress with these delightfully spooky treats!
Why You’ll Love This
- Fun & Festive: These brownies are the perfect Halloween treat, adding a touch of whimsy to your celebrations.
- Fudgy & Delicious: We start with a classic, incredibly fudgy brownie recipe – the base for all the magic!
- Relatively Easy: While they *look* impressive, the assembly is straightforward and doesn’t require advanced baking skills.
- Kid-Friendly: Get the little ones involved! They’ll love helping to shape the hats and add the decorations.
- Customizable: Feel free to get creative with your decorations – sprinkles, edible glitter, and different colored icing all work beautifully.
Ingredients & Equipment
Ingredients:
- For the Brownies:
- 1 cup (2 sticks) unsalted butter, melted
- 2 cups granulated sugar
- 4 large eggs
- 1 teaspoon vanilla extract
- ¾ cup unsweetened cocoa powder
- 1 cup all-purpose flour
- ½ teaspoon baking powder
- ¼ teaspoon salt
- For the Hats:
- 1 cup semi-sweet chocolate chips, melted
- For the Decoration:
- Green frosting (store-bought or homemade)
- Orange sprinkles or fondant for the buckle
Equipment:
- 9×13 inch baking pan
- Parchment paper
- Mixing bowls
- Whisk
- Rubber spatula
- Small offset spatula or knife
- Round cookie cutter (approx. 2.5-3 inch diameter)
- Small piping bag (optional, for frosting)
Step-by-Step Instructions
- Prepare the Brownies: Preheat oven to 350°F (175°C). Line a 9×13 inch baking pan with parchment paper, leaving an overhang on the sides for easy removal.
- Make the Brownie Batter: In a large bowl, whisk together melted butter and sugar until well combined. Beat in eggs one at a time, then stir in vanilla extract.
- Combine Dry Ingredients: In a separate bowl, whisk together cocoa powder, flour, baking powder, and salt.
- Combine Wet & Dry: Gradually add the dry ingredients to the wet ingredients, mixing until just combined. Do not overmix.
- Bake the Brownies: Pour batter into the prepared pan and bake for 20-25 minutes, or until a toothpick inserted into the center comes out with fudgy crumbs attached.
- Cool & Cut: Let the brownies cool completely in the pan before lifting them out using the parchment paper overhang. Cut into squares, then use a round cookie cutter to cut out circles. You should get around 12-16 circles.
- Create the Brims: Melt the chocolate chips in a microwave-safe bowl in 30-second intervals, stirring until smooth. Dip the top half of each brownie circle into the melted chocolate, creating a “brim” around the edge. Place on parchment paper to set.
- Decorate the Hats: Once the chocolate has set, frost the top of each brownie with green frosting to resemble a witch’s hat. Add an orange sprinkle or a small piece of orange fondant to the front as a buckle.
Pro Tips
- Don’t Overbake: Fudgy brownies are the goal! Slightly underbaking is better than overbaking.
- Chill the Brownies: Chilling the brownies before cutting makes them easier to work with and prevents them from crumbling.
- Melt Chocolate Carefully: Be careful not to burn the chocolate when melting. Use short intervals and stir frequently.
- Piping Bag for Frosting: Using a piping bag with a small round tip makes it easier to create neat frosting swirls on the hats.
- Get Creative with Decorations: Experiment with different sprinkles, edible glitter, or even small candies to personalize your witch hats.
Storing Leftovers
Store leftover Witch Hat Brownies in an airtight container at room temperature for up to 3 days. For longer storage, you can refrigerate them for up to a week. They can also be frozen for up to 2 months. Let them thaw completely before enjoying. If refrigerated, they may become slightly firmer, but will still be delicious!
Print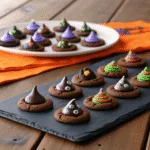
Witch Hat Brownies
- Total Time: 10 minutes
- Yield: 24 cookies 1x
- Diet: Vegetarian
Description
These adorable witch hat cookies are the perfect no-bake Halloween treat made with fudge-striped cookies, Hershey’s Kisses, and colorful frosting. Easy, festive, and fun for kids to make!
Ingredients
1 package fudge-striped shortbread cookies
1 bag Hershey’s Kisses, unwrapped
1/2 cup chocolate frosting or colored decorating icing (orange, green, purple, or black)
Sprinkles or edible glitter (optional)
Instructions
1. Lay out the fudge-striped cookies upside down on a tray or baking sheet so the solid chocolate side is facing up.
2. Pipe a small circle of frosting or decorating icing in the center of each cookie.
3. Press a Hershey’s Kiss onto the frosting, securing it in place to create the tip of the witch hat.
4. Optional: Add sprinkles or edible glitter around the base for extra decoration.
5. Let the frosting set for 10–15 minutes before serving or packaging.
Notes
For a colorful twist, use different colored icing to match your Halloween theme. These make great party favors or a fun edible craft for kids. Store in an airtight container at room temperature for up to 3 days.
- Prep Time: 10 minutes
- Cook Time: 0 minutes
- Category: Dessert, Snack
- Method: No-Bake
- Cuisine: American
Nutrition
- Serving Size: 1 cookie